
Modern WordPress themes have a lot of customization options and settings and almost everything is possible to change. But sometimes some small detail setting is not included into theme options panel. This article will show you how to change anything you want with custom css styling.
First of all we need to clarify, that there is 2 ways to add custom css code into theme. First is to add custom css into wp admin panel / appearance / customize / additional css. And the second one is to add your css code into child theme’s style.css file. You need to install child theme, activate it and all your code should be added into that style.css file, all styling will be overwritten with parent theme styles. Note, that with both methods of adding custom css styling, no data will be lost on parent theme update. Never change parent theme files, because on update all your changes will be lost.
So let’s go with exact examples:
For example you use Byron WordPress theme ( theme demo link ) and want to change inner page featured title yellow line width, color, visibility and other settings and in the option panel you can not find where to change it, that option not available.

Okay, goto that page in your browser. First of all you need to navigate your mouse pointer to that line element. Then press mouse right click, you will see “Inspect” section. By pressing on this section, you will see generated html code of the page on the left area and css code of this element on the right area. Sometimes you need to play with html and css to navigate to the exact element that you want, because when you press “Inspect”, element usually navigated to the top level element and to navigate more deep to top level nested elements, you need to browse through nested html tags to find exact element and exact css styling of the element that you want to change.
In this example we will not see css styling of yellow line element at once, by pressing “Inspect”, because this line is created with “:after” selector and it is nested into title heading group. So after pressing “Inspect element” open div tag to see nested tags and you will see “after” selector. When you hover on tags in generated html code, you will see what exact element you are navigated at that moment on your page.
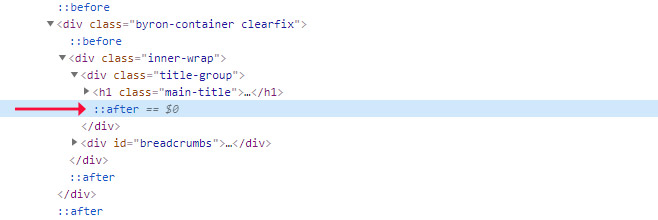
When we click on “after” selector, on the right area we will see css code for this element. Scroll css a little to see this element css:
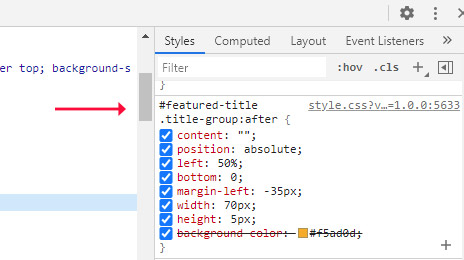
Now you can add, remove and edit that css styling, directly in browser. Play with styles, and you will see how your page styling is changing too. For example you want to change background color, that style is crossed out, so style is not applied, because it is overwritten with another style above. If you will simply change that css color, it will not apply, so you need to add this kind of code:
background-color: #2a9d8f !important;
Now you will see that line color is changed in your browser. So lets grab this style and add into customizer / additional css. It will look like this. You need to copy selector of this element and css styling:
#featured-title .title-group:after {
   background-color: #2a9d8f !important;
}
For example if you want to delete this line, css class should look like this. And don’t forget to comment all your css styles to make things easy for future:
/* Hide featured title line */

#featured-title .title-group:after {
   display: none;
}
Conclusion: Adding custom css styles into your theme is very easy, you simply need to play with inspector tool a little, grab correct class and id of the element, edit style css and it is done.